Tuesday, March 29, 2011

Quilted Symphony revision. . .

My borders were on and I was getting ready to put on the binding.  But as I was looking at it I felt that something wasn't quite right.  As busy as this quilt is I felt that a limited amount of quilting was enough.  Upon study of the finished product, however, I realized I was wrong!
As pictured here, the pieced segments on each side of my center segment were outline quilted.  I determined that more quilting was needed in these segments to pull them to the background and give a little more detail for the eye to see.  I also realized that the original stitching tension was poor which is always an issue for me!  So I picked it out and quilted some more. . .
. . .to get these results.  The pieced segments are individually outlined which took them to the back and gave the eye something more to look at (not that I really needed more LOL).  Now I could put the binding on.
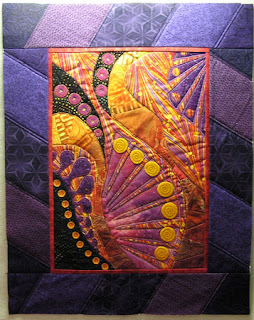
And here's the finished product!  I am very satisfied with it.  I know that the majority of observers would not notice what I did.  But in the end, as the creator, I am the one that has to be happy with it.  What was going to take me one hour to finish took me four.  But I will never be afraid to take the time to make my creation the best it can be, nor should you.

Sunday, March 27, 2011

Quilted Symphony workshop continues. . .

Our monthly workshop was held this week.  For me, classes are an opportunity to be a study of color and techniques as each individual puts their own spin on the project which are then shared with the class.  Here are the working visions of our workshop participants.
These colors are right up my alley!
Beading embellishment added.  Great idea!


Captivating neutrals!
Who would have thought to use Daiwabos? 
I will be excited to see the finished projects and hope to be able to share them.  Keep taking classes and expanding your quilting horizons.

Friday, March 25, 2011

Quilted Symphony gets quilted and borders. . .


The quilt center is pieced together and it's time to add borders and quilt it.  For this piece I wanted to add a flange between the quilt center and border.  I decided to quilt the center and then add the borders so that I would not have to fight with the flange while quilting.  I layered the quilt center giving an extra 5" all the way around for the batting and backing.  That would allow me to determine the outer border's size later.
The quilt center was basted to the batting and backing.  I then quilted by outlining the segments' shapes.  As there was a lot going on with the fabric choices, I kept the quilting simple and limited.
Once quilted, I selected a red batik for the flange.  The flange is a 1" strip folded in half and pressed wrong sides together.  I measured the sides, cut the flange to fit, and basted it to the sides 1/8 from the center's edge.
The top and bottom were then measured and the flange added as above.
Due to the busyness of my quilt, I felt that the outer border needed to be made from more than a simple single fabric.  My choice was to strip-piece fabrics that I would then cut on the diagonal to create a diamond-pieced border.
I began by stripping five 4 1/4" fabrics.  I pressed the seams open.
I then cut the strips at 3 1/4" on a 60 degree angle, centered the cut strip on the sides of the quilt center and sewed it to the quilt sewing through the three layers.  This seam now also becomes a quilted line as well.
I then centered the cut strips to the top and bottom and sewed them.
The border was then quilted.  I now squared and trimmed the excess of the layers.
The binding needs to be added, but wait there's more to the story.  Keep checking in.


Wednesday, March 23, 2011

Quilted Symphony coming together. . .

It's time to put all of our pieces together.  Begin by pinning section 1 to the stabilizer base.  Press the side of section 2 under, hiding the stay-stitches, that will be sewn to section 1.  Pin.

Stitch together with stitch you've decided on.  I tried three stitch types before I decided which I liked best:
The first stitch tried was the blind hem stitch.  It is found on my Janome in Mode 3, #33.  My settings were 1.5, 1.5.  Felt so-so about it.
I next tried a zigzag stitch, usually a favorite of mine.  That was found in Mode 1, #8 on my machine.  My settings were 1.0, 1.5.  Not too crazy about it.
To my surprise, my favorite stitch turned out to be the applique (or buttonhole) stitch, Mode 2, #38 on my machine, settings 1.5, 3.0.  For thread I used smoke monofiliment thread in the top and purple Bottom Line in the bobbin.  My needle choice was a 75/11 Quilting needle.  This is my preferred needle for quilting, especially batiks.
I continued stitching, pressing, pinning, stitching each section in numerical order.  I did find that all of my seams went from the center out in both directions.
Whala, it's all together.  More to come as it's time to quilt and put on borders.


Tuesday, March 15, 2011

Quilted Symphony foundation piecing. . .

The last segments needed to pull our project together are pieced.  Due to the unusual sewing lines, these segments are foundation pieced. 
Begin by tracing segments 3 and 6 from the project sheet onto tear-away stabilizer.  Label the segments including the top end of the segments.  Cut out 1/2" away from drawn edge.  Turn over and trace outline to the backside.  Label as back.  This is the side your fabric will be sewn to.
Retrace segments onto freezer paper labeling wedges from top A, B, C, etc. 
Cut apart Wedge A, press to frontside of fabric adding 1/2" seam allowance.
I precut all of my wedges to I could determine my fabric choices. Notice that the fabric wedges are reversed from the stabilizer they will be sewn to.
Fold tear-away stabilizer at A/B seam line.  Line up Wedge A with section A on stabilizer; pin in place.  Using ruler, trim fabric to 1/4" seam allowance.  If you have, use an add-a-quarter ruler.
Cut out Wedge B from freezer paper and press to corresponding fabric.  Match up Wedge B edge to cut Wedge A edge, right sides together.  Sew to drawn line on backside of tear-away stabilizer, beginning and ending a few stitches outside the line.
Turn over and press seam toward Wedge B, covering the next section on stabilizer.  Continue for all wedges until segment complete.  From the backside, stitch 1/8" outside of drawn line.  Trim to 1/4" outside of drawn line.
The segments can now be laid together.  Now I just have to stitch them together.  Keep watching.